Prepare a notification page
Why notification
The notification link/url is called by DV PASS to notify you of the status of a payment. This url must be available to accommodate HTTP requests of type GET and POST and return statut HTTP 200 OK .
The notify_url must be the only mechanism to implement to automatically synchronize payments to your merchant site. DV PASS will call this link after each update to notify you of status changes during a transaction.
At the end of a payment, DV PASS systematically calls the notification url for the concerned service. This call aims to inform the merchant site of the payment status (even if the customer does not return to the site). The merchant will then be able to validate the order if the payment is verified and accepted.
The notification url is not necessary if you don't need to have the payment status in your database, as you have the payment history in your DV PASS backoffice.
Ex: Donation collection application.
STEPS TO CONFIGURE THE NOTIFICATION URL
1-RECEIVE A NOTIFICATION
The server executes a POST request containing :
- cpm_trans_id: the transaction_id variable that you sent at initialization
- cpm_site_id: the site_id variable you sent at initialization
- cpm_trans_date: the date and time of the transaction
- cpm_amount: the amount
- cpm_currency: the currency
- signature : the generated token
- payment_method : the payment method
- cel_phone_num: the number used to make the payment
- cpm_phone_prefixe: the country prefix
- cpm_language: the language in which the payment was made
- cpm_version: the version used (V4)
- cpm_payment_config: the type of payment (Single)
- cpm_page_action : the type of action (Payment)
you will have to collect mainly cpm_trans_id and cpm_site_id posted by DV PASS for the continuation of the configuration.
To ensure the integrity of the data you are processing, you need to perform some checks:
- Your notification url must be an api that expects a call in POST and as a parameter the cpm_trans_id (corresponding to the transaction_id variable)
-
After getting it, you have to check in your database that the status of the payment concerned is already successful:
- If yes then you are no longer updating;
- If not, you must make a call to the transaction verification API to obtain the status of the transaction from DV PASS and thus update the status in your database.
2-VERIFY TRANSACTION STATUS
- DV PASS will not send you the transaction status information to avoid some loophole security like the man in the middle.
- The notification url can be called multiple times.
- You will always have to make a call to the payment "Verification of transaction" API for have the true values of the payment.
To know the status of a transaction, you must send the following information in JSON format.
Using this url: https://api.epaycs.com/v2/payment/check
- apikey : your apikey
- site_id : your site_id
- transaction_id : your transaction_id or token : The payment_token obtained during the initialization of the payment
for more details, please see the section Transaction verification
3-DELIVERING A SERVICE
When the payment is successful, you will receive this response from DV PASS:
 {
    "code": "00",
    "message": "SUCCES",
    "data": {
        "amount": "100",
        "currency": "XOF",
        "status": "ACCEPTED",
        "payment_method": "OM",
        "description": "GFGHHG",
        "metadata": null,
        "operator_id": "MP210930.1743.C36452",
        "payment_date": "2021-09-30 17:43:30"
    },
    "api_response_id": "1633023959.8459"
}
{primary.fa-info} Then you will have to deliver the service. Don't forget to update your database.
In case of failure, you will receive this answer from DV PASS:
 {
    "code": "600",
    "message": "PAYMENT_FAILED",
    "data": {
        "amount": "100",
        "currency": "XOF",
        "status": "REFUSED",
        "payment_method": "OM",
        "description": "GFGHHG",
        "metadata": null,
        "operator_id": null,
        "payment_date": " "
    },
    "api_response_id": "1633024200.1830"
}
{primary.fa-close} No services shall be provided. Don't forget to update your database.
TEST YOUR NOTIFICATION URL
After payment, you can test your notification url using an http request application. For the example, we will use PostMan.
Available GET
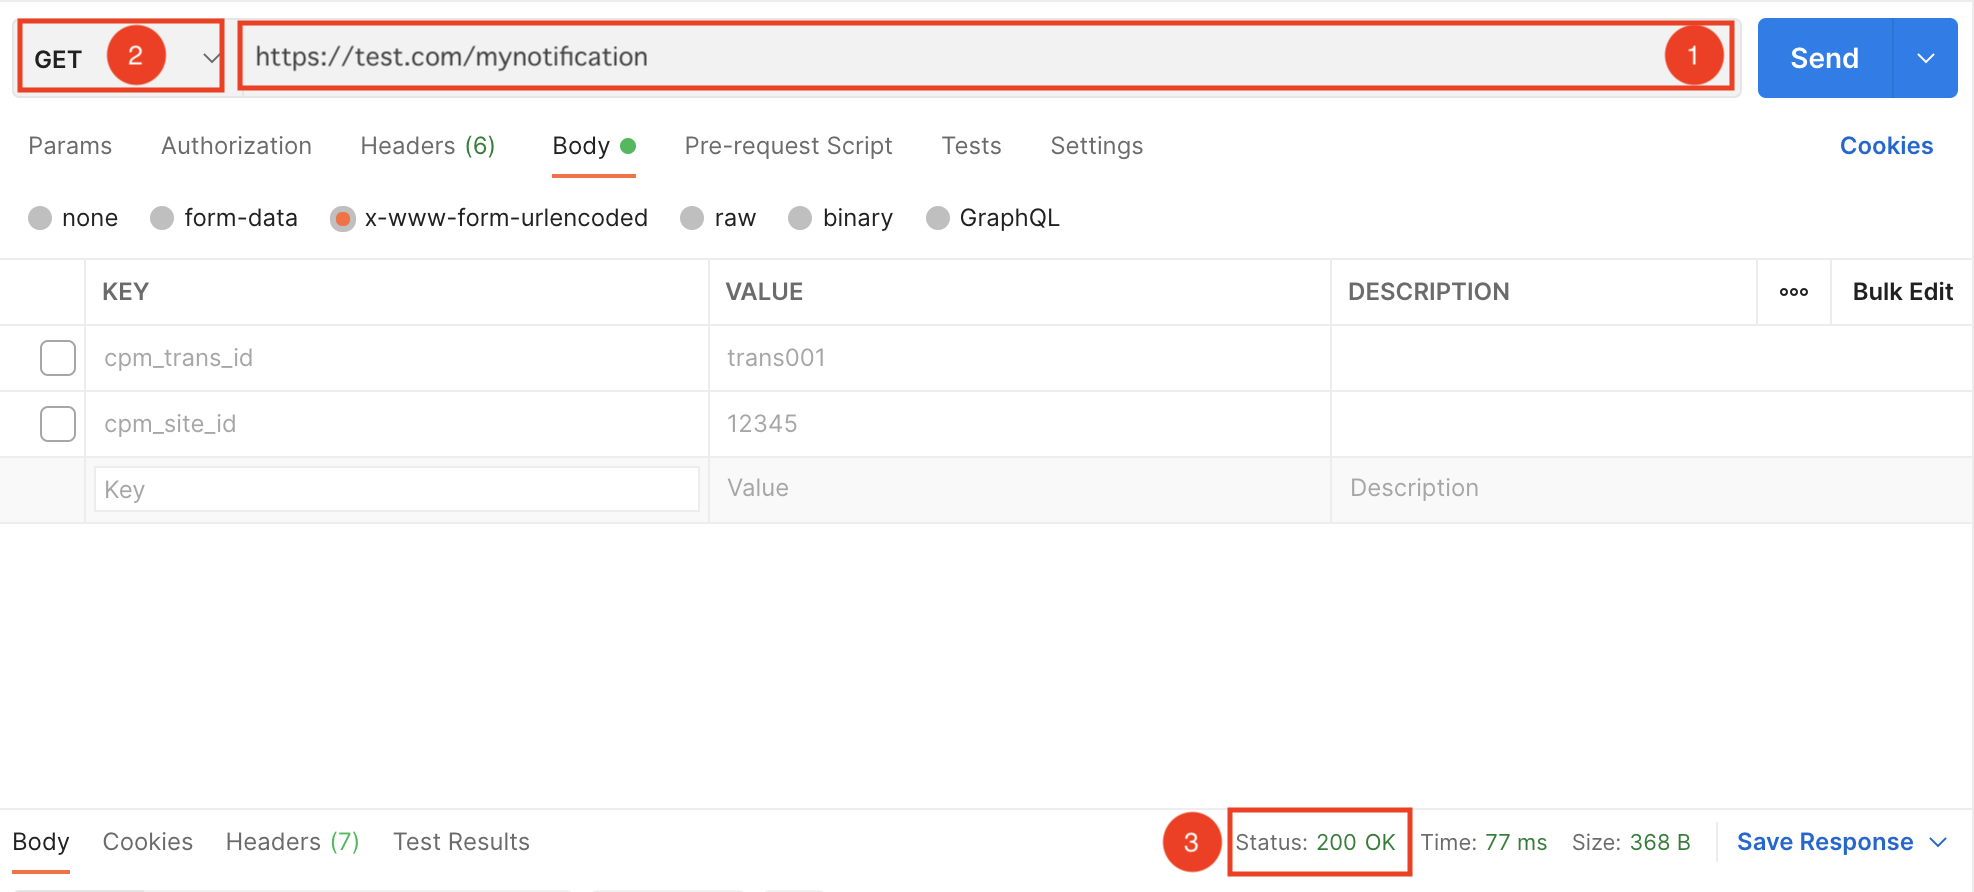
1) Enter your return url
2) Select the GET method, then click on "Send
3) You should receive Status 200 OK(If this is not the case, you will find the cause here )
Available POST

1) Enter your notification url
2) Select the POST method
3) Select the content-type x-www-form-urlencoded
1) Enter cpm_trans_id and cpm_site_id with their respective values, then click on "Send".
4) You should receive Status :200 OK(If this is not the case, you will find the cause here )
Status error
| Code | Cause | Solution |
|---|---|---|
| Status: 404 | Your url was not found | Check that the url entered is correct. |
| Status : 419 | This error is due to the crsf token of laravel which must be sent for each POST request. | Disable token verification by mentioning your route name in app/http/middleware/VerifyCsrfToken.php |